I have been helping our friends build a chicken coop so that they can start raising their own hens and producing their own eggs. The week before I helped them build a compost pile so that they could start composting their yard waist on a larger scale, now we move into coop development. After researching different designs and methods for building a coop I decided to go with one that would fit well in the tropics. Much like San Diego, you don’t have to worry about a freeze or the chickens getting to cold, however you do need to be concerned with other natural elements like predators, tropical rain storms, gusty winds and too much heat. Taking this into consideration I designed a coop that would protect the hens from the elements, yet be opened up enough to allow a breeze and shade for the hens to grow in.
Chicken Coop Design

The structure of the coop is 4x8x8. It is 4 ft wide by 8ft long and 8ft high at its highest point. The floor of the hen house is three feet off of the ground. There is a thatched roof covering the length of the coop to keep out the rain and sun. The roofs highest point is at 8ft (in the center) dropping down to 6ft on the front side, and 7ft on the back side. This allows for a consistent air flow throughout the coop

I designed the coop on paper, worked out the measurements and then we started putting it together after we picked up the supplies. As expected we made a few adjustments as we began to put the coop together to fit the surroundings a little better. One thing that I didn’t keep in mind was the slope that we would be working on, this eventually elevated the ‘run’ side a little more giving the hens an extra 6 inches to play around in.
Chicken Coop Supplies
- 3 4×8′ 1/2″ pieces of plywood
- 22 2x4x8′ studs
- 12 2x2x8′ studs
- 2 4×8′ roofing sheets
- 1 4×50′ roll of chicken wire
- 1 large box of 3.5″ screws
- 1 large box of 2″ screws
- 8 hinges
- 4 latches
- 4 cinder blocks
- 2 Boxes of Staple Gun Stapels
- Poultry Feeder
- Poultry Water Bottle
- Wood Shavings or Hay
Tools Needed to Build the Chicken Coop
- Drill
- Staple Gun
- Skill Saw
- Hammer
- Wire Cutters
- Tape Measure
- Level
- Shovel
- Pen or Pencil
Chicken Coop Structure

After we picked a location by the mango tree, the first thing that we did was put together the frame. This would be our skeleton if you will, everything else would be built off of the frame. As mentioned before the frame of the structure is 4ft wide by 8ft long. We put 6ft posts on the front side, 7ft posts on the back side, and two 8ft posts on the ends (for the roof). Notice the cinder blocks used to give us a level playing field, not the prettiest look, this is something that we will fix up as we finish the project.
The first step was building the two main frame pieces.
Keep in mind that 2×4’s aren’t realy 2 inches by 4 inches, in most cases they are 1 1/2 inches by 3 3/4 inches. This means for your first step you need to make 45″ cuts in your 8ft 2×4 studs, in stead of straight 48″ cuts, you will make up the difference in the extra 1 1/2″ outside studs to make an exact 4×8 frame. You will use the entire 96″ or 8′ for the long side of the frame.

Step 1 (Frame):
- Make six 45″ inch cuts in your 2x4x8′ studs
- Attach 45″ cuts to the inside of the 8′ studs

Step 2 (Frame):
- Make three six foot 6′ Cuts in the 2x4x8’s
- Make three seven foot 7′ Cuts in the 2x4x8’s
- Attach the three 6′ cuts on the inside corners of one side of the frame (36″ gaps in frames)
- Attach the three 7′ cuts on the inside corners of the other side of the frame (36″ gaps in frames)
- Attach three 8′ studs on the outside of the frame (center at 24″ in) and one on the center studs inside the frame

Step 3 (Roof Frame):
- Make three 42″ Cuts in the 4x2x8’s
- Make three 36″ Cuts in the 4x2x8’s
- Connect a 8′ 2×4 on top of the 8′ studs previously installed
- Connect three 42″ Cuts from 8′ top stud to the outside of the 6′ side top frame
- Connect three 36″ Cuts from 8′ top stud to the outside of the 7′ top frame
*Depending upon what type of material you use for your roof, you may want to add a couple of more support studs on each side of the roof frame 5 42″ cuts on the 6ft side and 5 36″ cuts with 1′ extensions pieces on the 7ft side.
Chicken Coop Construction

After we got the frame up we started to work on the hen house itself, this is where the hens will go to lay their many eggs in the future. We closed off the floor and the back wall first because these are permanent, no doors or latches needed. In this picture you can see that we also added a few more frame pieces for the roof, this was because of the type of roofing that we decided to go with. You will be able to see why when we finish.

Step 4 (Hen House Walls):
- Make one 36″ 2×4″ cut (center stud on inside wall)
- Make one 24″ 2×2 cut (top frame for breather gap on front wall)
- Make one 4’x4′ Plywood cut out of 4×8′ piece of plywood (floor)
- Cut out 1 1/2″x 3 3/4″ rectangles out of each corner of 4×4′ floor piece of plywood (room for studs)
- Make one 3’x4′ plywood cut (Back Wall)
- Make one 3’x2′ plywood cut (inside wall)
- Make one 33″x24 1/2″ plywood cut (front wall)
- Lay down 4×4′ plywood floor (align cut out corners of plywood for snug fit)
- Attach 36″ 2×4″ center stud on front wall
- Attach one 24″ 2×2 top frame on front wall 33″ up (Leave 3″ breather gap)
Hen House Layout
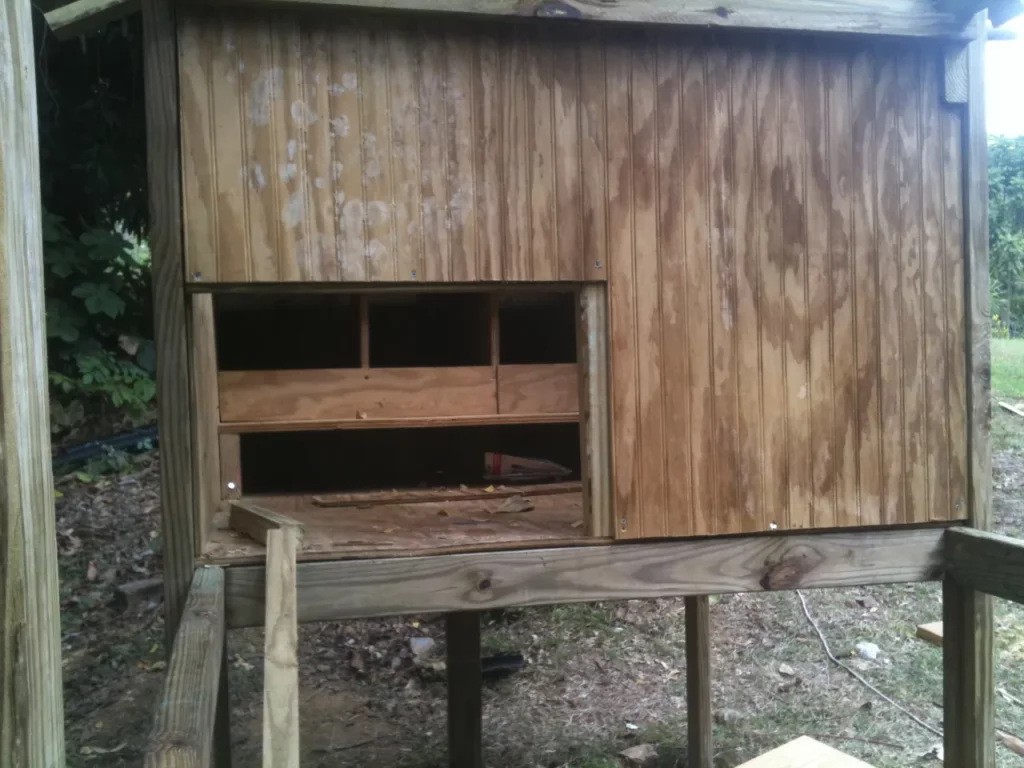
Once we put in the permanent walls and floor we began building the doors that would allow us access into the hen house for cleaning and feeding. This front door section will open up giving us plenty of room to work around the hen house.
Step 5 (Hen House Doors):
Egg Doors
- Cut two 23 1/2″ x 36 3/4″ cuts in plywood (egg doors)
- Cut four 23 1/2″ pieces from the 2x2x8′ studs
- Cut four 32 1/2″ pieces from the 2x2x8′ studs
- Attach two 23 1/2″ 2×2 to top and bottom of 32 1/2″ 2×2 pieces (create frames for two door)
- Attach 23 1/2″ x 36 3/4″ piece of plywood to frames
- Attach latches and hinge to Coop
Front Door
- Cut one 22 1/2″ x 36 3/4″ cuts in plywood
- Cut two 22 1/2″ pieces from the 2x2x8′ studs
- Cut two 32 1/2″ pieces from the 2x2x8′ studs
- Attach two 22 1/2″ 2×2 to top and bottom of 32 1/2″ 2×2 pieces (create frames to two door)
- Attach 22 1/2″ x 36 3/4″ piece of plywood to frames
- Attach latches and hinge to Coop
Nesting Boxes

Step 6 (Nesting Boxes):
The Nesting Boxes came next on our plans. We decided to do two rows of boxes 4 boxes deep. This gives us a total of 8 nesting boxes. Each box is 12″x12″12″. We started the bottom row 4 inches off of the floor and the next row 12 inches above that. We left a 3″ over hang to give the hens something to climb up to before entering their boxes. We also put a 4 inch lip on the front of the boxes making the entrance to the boxes 8″x12″. We did this to give the hens more protection and less room to move around. This should prevent them or the other hens from eating their eggs once they began producing.
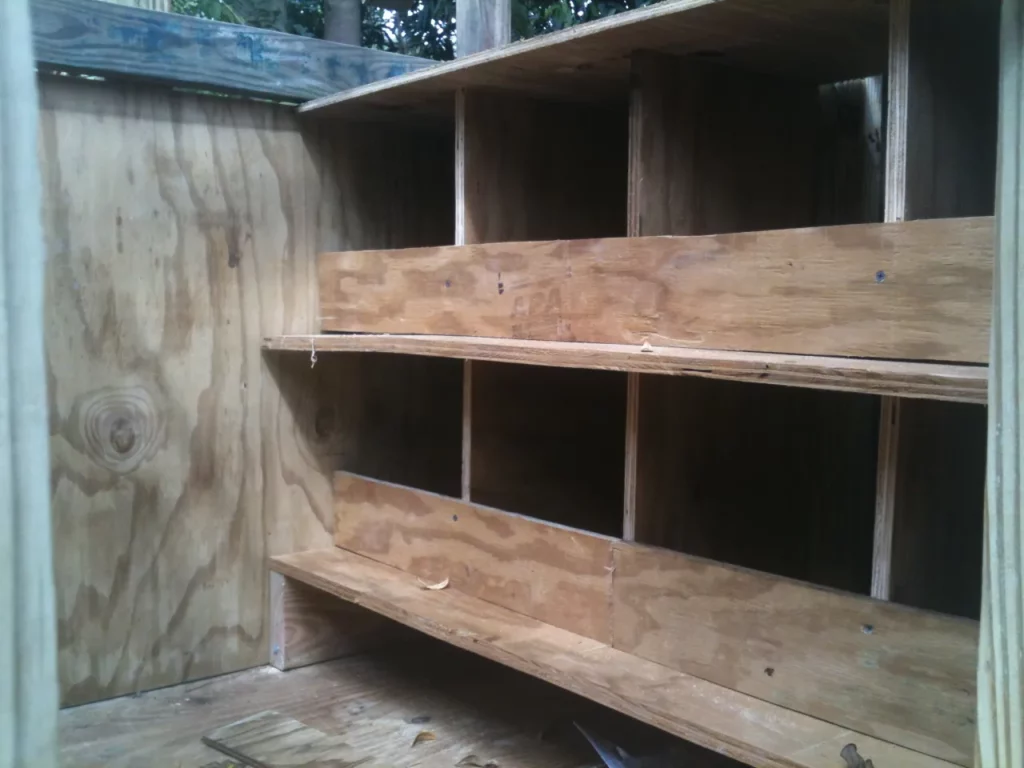
- Cut three 48″x15″ Pieces of 1/2 ” Plywood (floors and roofs)
- Cut six 12″x12″ Pieces of 1/2″ Plywood (separator walls)
- Cut two 4″x48″ Pieces of 1/2 Plywood (Front Ledge)
- Cut six 12″ Pieces of 2×2 studs (support)
- Cut two 15″ Pieces of 2×4 stud (bottom rise)
- Attach six 12″ 2×2 to the 6 12×12 Pieces of Plywood (Support)
- Attach three 12×12 Pieces to 48×15″ Piece of Plywood (12″ gaps)
- Repeat above step with second piece of 48×15″ Plywood
- Stack pieces on top of each other and attach 3rd piece of 48×15″ of plywood as roof
- Attach remaining 48×4″ plywood pieces as front lips
- Place two 15″ 4×4 studs on the bottom of the coop (floor rise)
- Place Nesting boxes on top of 4×4 studs inside of the coop
Behind the nesting boxes, on the outside of the hen house we installed two barn style doors to give us easy access to all of the boxes, thus giving us easy access to the eggs down the road. This will also make it easier for cleaning an maintenance when the time comes.
Hen House Entrance
Next we will put up the roof, chicken wire enclosure and last minute adjustments. As you can see the Tropical Chicken Coop at this point is coming along just fine.
Step 7 (Chicken Coop Roof):
- Cut two 48″x36″ cut in 4×8′ roof sheet
- Cut two 48″x42″ cut in 4×8′ roof sheet
- Attach two 48″x42″ pieces onto 6ft side of coop (from top beam to top of support beams)
- Attach two 48″x36″ pieces onto 7ft side of coop (from top beam to top of support beams)
- Attach 8′ top piece to top beam on coop
Step 8 (Chicken Coop Gate & Final Touches)
- Cut one 36″ piece of 2×4 stud
- Cut four 9″x9″ corner triangle pieces
- Cut two 36″ pieces of 2×2 stud
- Cut two 32″ pieces of 2×2 stud
- Cut one 51″ piece of 2×2 stud (add 45 degree angle cut on both ends)
- Attach 36″ 2×4 as door frame (12″ from center stud)
- Attach 32″ 2×2 pieces to the inside of the the 36″ 2×2 pieces (make a 36″x36″ sq frame)
- Attach 51″ 2×2 at angle for frame support
- Attach four 9″x9″ triangle pieces to the four inside corners of frame (9″ * 9″ * 12 3/4″)
- Attach chicken wire to outside of frame
- Attach gate to hinges on the outside of coop frame (swing out)
- Attach latch to gate and frame for security
- Add perches and walkway to hen house In chicken run area
- Cover the entire coop with chicken wire (it is a good idea to burry chicken wire 6 inches into the dirt facing out for added protection from predators.
- Add Poultry Feeders and Water Bottle
- Add Chickens


Leave a Reply